Collagraphs, carved printing plates and stamps for the gelli plate
Hi again everyone. I have made an exciting discovery (well to ME anyway!). I can make EASY engraved printing plates with my personal cutting machine. YES!!!! I personally have an older KNK Maxx machine, which has since been superseded by the Zing and another heavier cutter called the Force. Mine is kind of in the middle of these, cutting power wise.
When I first got the machine, I really wanted to cut mat board - you know the stuff you use to frame pictures, but found the machine wasn't really strong enough. Most aren't, although the new KNK Force can apparently do it. I could get close though, with it cutting through enough of the layers to give me clean lines which I could finish off with a craft knife. Haven't done it for ages, but recently while watching a video tute on gelli printing techniques, I saw an engraved mat being made by hand. A pretty time consuming process! She was carving out the image into mat board, rather similar to lino cutting. An age old technique and still a good one to get sharp complicated images printed and wonderful to use on the gelli plate. However, as I said.............time consuming!
Now most of you know, particularly if you have watched my Youtube channel that I am NOT the Princess of Patience and although I really wanted to use this technique, I did not want to spend an hour or two cutting out tiny little shapes and peeling them back. THEN I remembered my mat board cutting experiments and thought "I wonder if I used the cutting machine to incise into the board if it would make the process easier?" And guess what?
Proof !This is how it came out of the machine after 4 passes and, ordinarily I would not have been happy with all the little tags and lifting, but for this purpose.... Oh joy!! The lifted bits made it so easy to peel layers back and it was amazingly QUICK. I had the whole thing peeled back in a jiffy - less than 5 mins. WOW! So that taken care of and ready for experiment on my gelli plate, I again pondered......
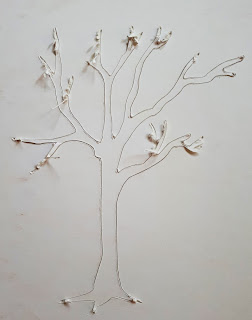
 I wonder if I could also use the machine to make a collagraph, which is basically the opposite of the above technique, as it has the image raised from the surface instead of carved into it. A stamp really! The first way I thought of was to simply repeat the process above, but rather than carve out the positive image (tree), I could remove the negative space (background). Absolutely would work, but I felt there was an even easier way. So I cut 2 of the same images of the tree from cereal box cardboard and glued them together as per pic at right. Done!! Both positive and negative images of the same tree and super easy and time effective!
The alternative would be cutting the image from craft foam or stamp material, but my cutter is a bit fussy about craft foam if the shape is complicated and I currently don't have any stamping material for the cutter (but I DO have an idea about that too. Stay tuned! LOLS).
Just a reminder to those who may not have seen my Youtube videos, that there are several on using craft or fun foam as stamps starting here

When I first got the machine, I really wanted to cut mat board - you know the stuff you use to frame pictures, but found the machine wasn't really strong enough. Most aren't, although the new KNK Force can apparently do it. I could get close though, with it cutting through enough of the layers to give me clean lines which I could finish off with a craft knife. Haven't done it for ages, but recently while watching a video tute on gelli printing techniques, I saw an engraved mat being made by hand. A pretty time consuming process! She was carving out the image into mat board, rather similar to lino cutting. An age old technique and still a good one to get sharp complicated images printed and wonderful to use on the gelli plate. However, as I said.............time consuming!
Now most of you know, particularly if you have watched my Youtube channel that I am NOT the Princess of Patience and although I really wanted to use this technique, I did not want to spend an hour or two cutting out tiny little shapes and peeling them back. THEN I remembered my mat board cutting experiments and thought "I wonder if I used the cutting machine to incise into the board if it would make the process easier?" And guess what?
IT WAS MADLY, DELIGHTFULLY, WONDERFULLY SUCCESSFUL!

Proof !This is how it came out of the machine after 4 passes and, ordinarily I would not have been happy with all the little tags and lifting, but for this purpose.... Oh joy!! The lifted bits made it so easy to peel layers back and it was amazingly QUICK. I had the whole thing peeled back in a jiffy - less than 5 mins. WOW! So that taken care of and ready for experiment on my gelli plate, I again pondered......

The alternative would be cutting the image from craft foam or stamp material, but my cutter is a bit fussy about craft foam if the shape is complicated and I currently don't have any stamping material for the cutter (but I DO have an idea about that too. Stay tuned! LOLS).
Just a reminder to those who may not have seen my Youtube videos, that there are several on using craft or fun foam as stamps starting here

"Be a Tree" made with the collagraph plates

Comments
Post a Comment